

Unpolished concrete surfaces in homes and commercial properties often look dull, collect dust, and wear down quickly under foot traffic. These issues not only detract from your property’s appearance but also create ongoing maintenance headaches and potential safety concerns. Polishing and coating concrete transforms these tired surfaces into durable, attractive floors that resist stains, reduce dust, and enhance property value. This guide walks you through the complete process of preparing, polishing, and protecting concrete surfaces, giving Queensland homeowners and commercial managers the knowledge to make informed decisions about their flooring projects.
Table of Contents
- Preparing Your Concrete Surface For Polishing
- Step-By-Step Process For Polishing Concrete
- Applying Coatings And Sealing Polished Concrete
- Maintaining Polished Concrete Floors For Lasting Beauty
- Enhance Your Polished Concrete With Quality Coatings From Floor X Industries
- Frequently Asked Questions
Key takeaways
| Point | Details |
|---|---|
| Durability boost | Polished concrete improves surface strength and resistance to wear, extending floor lifespan significantly. |
| Preparation matters | Thorough cleaning, repair, and grinding create the foundation for successful polishing results. |
| Grit progression | Using progressively finer diamond pads from 50 to 3000 grit achieves the desired gloss level. |
| Protective coatings | Epoxy or polyurethane sealers protect polished surfaces from chemicals, stains, and daily wear. |
| Maintenance routine | Regular cleaning and preventive care preserve the polished finish for decades. |
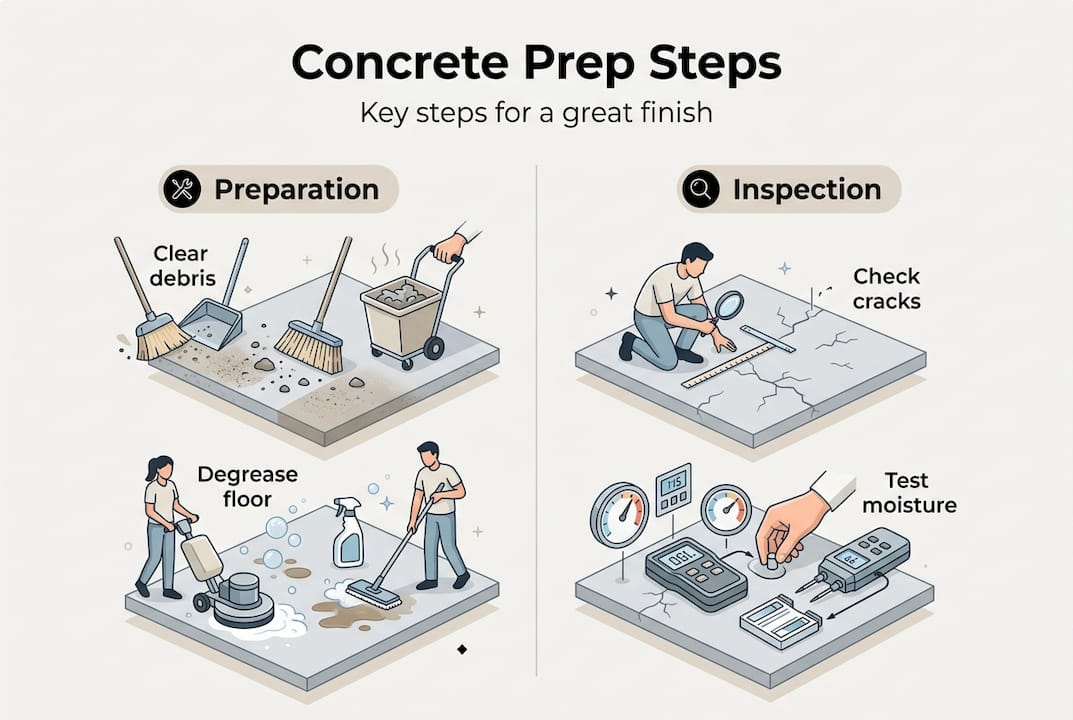
Preparing your concrete surface for polishing
Before you can achieve that mirror-like finish, your concrete needs proper preparation. This stage determines whether your polished floor will last decades or develop problems within months. Skipping preparation steps leads to uneven finishes, premature wear, and coating failures that cost more to fix than doing it right initially.
Start by removing everything from the surface. Sweep thoroughly, then use a degreaser to eliminate oil, grease, and stubborn stains that interfere with polishing. For commercial spaces with heavy contamination, consider using industrial cleaners or steam cleaning equipment. Any residue left behind will prevent proper bonding of coatings and create weak spots in your finished floor.
Inspect every square metre for cracks, spalling, or surface damage. Small hairline cracks might seem insignificant, but they expand during grinding and polishing. Fill cracks with epoxy crack filler or concrete patching compound, allowing adequate curing time before proceeding. For larger structural issues, consult a structural engineer to address underlying problems that could compromise your polished surface.
Moisture testing is critical, especially in Queensland’s humid climate. Use a moisture metre to check concrete moisture levels, which should typically be below 4% for successful coating application. High moisture content causes coatings to bubble, delaminate, or fail completely. If moisture levels are high, identify and address the source before continuing with polishing.
Mechanical grinding levels the surface and opens the concrete’s pores for better coating penetration. Use a planetary grinder with coarse diamond segments to remove surface laitance, old coatings, and minor imperfections. This step also profiles the concrete, creating the ideal texture for subsequent polishing stages. Proper preparation including cleaning and repairing surface defects ensures optimal polishing results, setting you up for success in later stages.
Pro Tip: Test your concrete’s hardness before selecting diamond tooling. Harder concrete requires more aggressive diamonds, while softer concrete needs gentler tooling to avoid excessive wear and achieve consistent results.
Here’s what you’ll need for proper surface preparation:
| Tool/Material | Purpose | Notes |
|---|---|---|
| Industrial degreaser | Removes oils and contaminants | Choose biodegradable options for environmental safety |
| Concrete grinder | Levels surface and removes coatings | Planetary grinders provide most even results |
| Crack filler/patching compound | Repairs surface damage | Epoxy-based fillers offer strongest bonds |
| Moisture metre | Tests concrete moisture levels | Essential for preventing coating failures |
| Diamond grinding discs | Initial surface profiling | Start with 30-50 grit for aggressive removal |
Step-by-step process for polishing concrete
With your surface properly prepared, you’re ready to transform rough concrete into a smooth, reflective finish. The polishing process uses progressively finer diamond abrasives to refine the surface gradually. Rushing through grit levels or skipping steps creates an inconsistent finish with visible scratches and dull patches.
Begin with coarse grinding using 50-100 grit diamond pads. This stage removes remaining surface imperfections and creates a uniform profile across the entire floor. Work systematically in overlapping passes, maintaining consistent pressure and speed. The concrete should appear evenly abraded with no high or low spots remaining.
Progress to medium grinding with 100-400 grit diamonds. This stage starts refining the surface texture and begins revealing the concrete’s aggregate. You’ll notice the surface becoming smoother and developing a slight sheen. Clean the floor thoroughly between each grit level to prevent contamination from coarser particles scratching the surface during finer polishing stages.
Apply a chemical hardener or densifier at this stage. These products penetrate the concrete, reacting with calcium hydroxide to create harder calcium silicate hydrate. This chemical reaction increases surface density, reduces porosity, and enhances the final polish. Allow the densifier to cure according to manufacturer specifications before continuing.
Move to fine polishing with 400-800 grit pads. The surface now develops noticeable gloss and the aggregate pattern becomes more prominent. This stage requires patience and attention to detail. Work slowly, allowing the diamonds to cut effectively without generating excessive heat that can damage the surface or equipment.
Continue with extra-fine polishing using 800-1500 grit diamonds. The floor should now have significant reflectivity and a smooth, glass-like texture. At this stage, you’re not removing material so much as burnishing the surface to a high shine. Polishing involves progressively grinding with finer diamond grits from coarse to fine to achieve a shining finish, and patience during these final stages determines your ultimate gloss level.
Finish with ultra-fine polishing at 1500-3000 grit for maximum reflectivity. This final stage creates that sought-after mirror finish. The concrete should reflect overhead lights clearly and feel completely smooth to touch. Some applicators add a polishing compound at this stage to enhance gloss further.
Pro Tip: Keep your polishing pads clean and replace them when worn. Contaminated or worn pads create inconsistent finishes and can actually damage previously polished areas, forcing you to restart from earlier grit levels.
Key considerations during polishing:
- Maintain consistent machine speed and pressure throughout each grit level
- Overlap passes by 50% to ensure complete coverage without missed spots
- Clean the surface thoroughly between grit changes using a wet vacuum
- Monitor pad wear and replace before they become ineffective
- Work in manageable sections to maintain quality control
- Allow adequate time at each grit level for proper surface refinement
Applying coatings and sealing polished concrete
Your beautifully polished concrete needs protection to maintain its appearance and resist daily wear. Coatings and sealers provide a barrier against stains, chemicals, moisture, and abrasion whilst enhancing the surface’s aesthetic qualities. Choosing the right product depends on your specific application, traffic levels, and desired appearance.
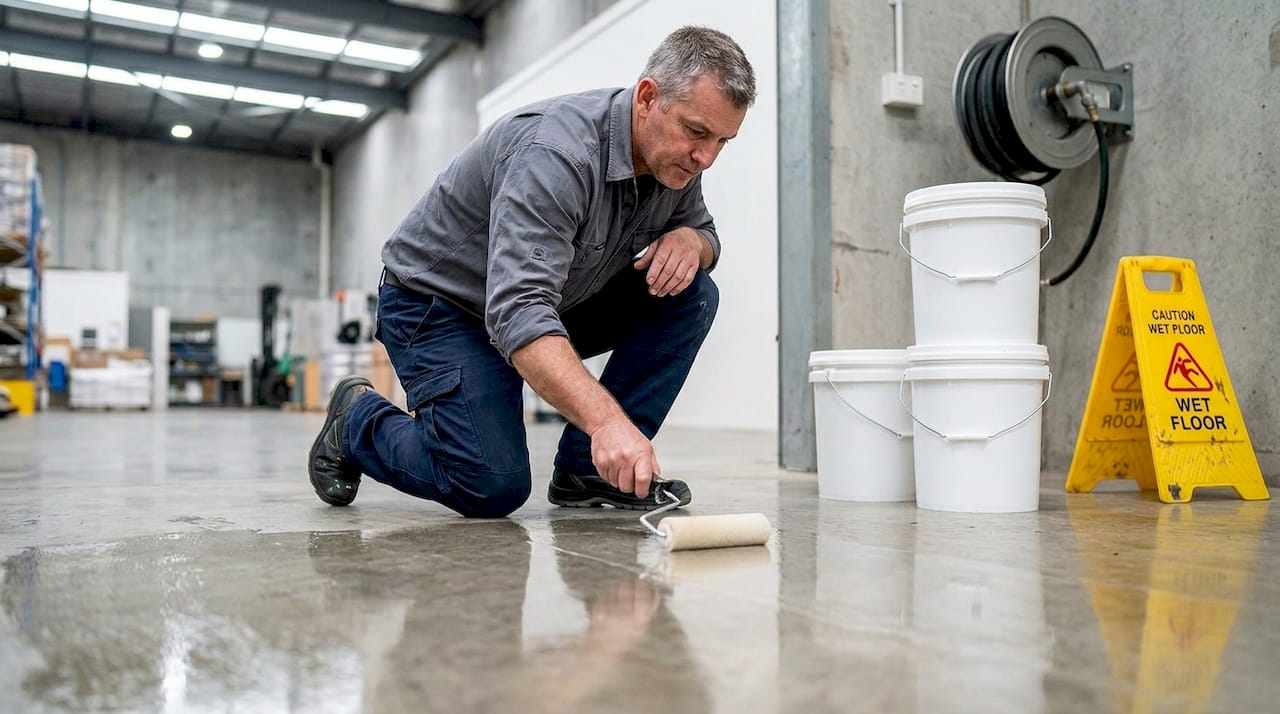
Applying epoxy or polyurethane coatings seals the polished concrete, protecting against wear and staining, making this step essential for long-term performance. Unsealed polished concrete, whilst attractive initially, gradually dulls and stains over time, especially in high-traffic or chemical-exposure environments.
Epoxy coatings create a thick, durable layer that bonds chemically with concrete. They excel in commercial and industrial settings where chemical resistance and impact protection are priorities. Epoxy provides excellent colour retention and can incorporate decorative elements like colour flakes or metallic pigments. However, epoxy can yellow under UV exposure, making it less suitable for outdoor applications or areas with significant sunlight.
Polyurethane coatings offer superior flexibility and UV resistance compared to epoxy. They’re ideal for areas exposed to sunlight or temperature fluctuations, as they expand and contract with the concrete without cracking. Polyurethane provides excellent abrasion resistance and maintains clarity over time. The trade-off is typically higher cost and more complex application requirements.
| Coating Type | Best Applications | Key Benefits | Limitations |
|---|---|---|---|
| Epoxy | Warehouses, garages, commercial kitchens | Excellent chemical resistance, impact protection, decorative options | Can yellow under UV, less flexible |
| Polyurethane | Retail spaces, outdoor areas, high-traffic zones | UV stable, flexible, superior abrasion resistance | Higher cost, requires precise application |
| Acrylic sealer | Residential patios, light commercial use | Breathable, easy application, cost-effective | Lower durability, requires frequent reapplication |
| Penetrating sealer | Polished concrete showrooms, minimal-sheen applications | Invisible protection, natural appearance | Limited surface protection, won’t hide imperfections |
Application technique significantly impacts coating performance. Start by ensuring the polished surface is completely clean and dry. Any dust, moisture, or contaminants prevent proper adhesion and cause coating failures. Use a tack cloth or microfibre mop to remove fine dust particles that regular sweeping misses.
Mix your coating according to manufacturer specifications, paying careful attention to mixing ratios and pot life. Apply the first coat using a roller or squeegee, working in manageable sections to maintain a wet edge. Avoid over-working the coating, which introduces air bubbles and creates an uneven finish. Allow the first coat to cure fully before applying additional coats, typically 24-48 hours depending on temperature and humidity.
Pro Tip: Apply coatings during optimal temperature and humidity conditions, typically between 15-30°C with relative humidity below 85%. Extreme conditions affect curing times and can compromise coating performance significantly.
Maintaining coated floors requires gentle care:
- Use pH-neutral cleaners specifically designed for coated concrete
- Avoid abrasive cleaning tools that scratch the coating surface
- Clean spills promptly to prevent staining or chemical damage
- Place walk-off mats at entrances to reduce tracked-in debris
- Schedule periodic professional maintenance to address wear patterns
Maintaining polished concrete floors for lasting beauty
Proper maintenance preserves your investment and keeps polished concrete looking spectacular for decades. Regular cleaning and preventive care significantly prolong polished concrete floor life, whilst neglect leads to premature dulling, staining, and costly restoration work.
Daily maintenance starts with dust mopping or sweeping to remove loose dirt and debris that acts like sandpaper under foot traffic. Use microfibre dust mops that capture fine particles without scratching the surface. For larger commercial spaces, consider auto-scrubbers with soft brushes that clean efficiently without damaging coatings.
Weekly damp mopping removes accumulated grime and maintains the floor’s lustre. Use a pH-neutral cleaner diluted according to manufacturer instructions. Harsh alkaline or acidic cleaners break down sealers and coatings, creating dull spots and reducing protection. Change your mop water regularly to avoid spreading dirty water across clean areas.
Address spills immediately, especially acidic substances like soft drinks, citrus juices, or cleaning products. Acids etch concrete and coatings, creating permanent dull spots if left untreated. Blot spills with absorbent cloths rather than wiping, which spreads the substance across a larger area.
Minor scratches and scuffs are inevitable in high-traffic areas. Light scratches often buff out using a polishing compound and soft cloth. Deeper scratches may require professional attention, potentially including localised repolishing or coating touch-ups. Catching damage early prevents it from spreading and becoming more costly to repair.
“The difference between polished concrete that lasts 10 years versus 30 years often comes down to consistent maintenance habits. Small daily efforts prevent major restoration expenses down the track.” – Floor maintenance specialist
Pro Tip: Schedule professional deep cleaning and recoating every 3-5 years depending on traffic levels. This preventive maintenance refreshes the surface protection and addresses minor wear before it becomes significant damage.
Common maintenance mistakes to avoid:
- Using vinegar or other acidic cleaners that etch the surface
- Allowing standing water to remain on the floor for extended periods
- Dragging heavy equipment or furniture without protective pads
- Using abrasive scrubbing pads that scratch coatings
- Neglecting entrance matting that prevents tracked-in debris
- Ignoring early signs of coating wear or damage
For commercial spaces, develop a documented maintenance schedule that assigns specific tasks to staff members. Include daily sweeping, weekly mopping, monthly inspections, and annual professional maintenance. Consistent execution of this schedule ensures your polished concrete maintains its appearance and performance throughout its lifespan.
Consider the long-term cost benefits of proper maintenance. Whilst daily cleaning requires time investment, it’s far less expensive than premature repolishing or coating replacement. Well-maintained polished concrete can last 20-30 years before requiring significant restoration, making it one of the most cost-effective flooring options available.
Enhance your polished concrete with quality coatings from Floor X Industries
Transforming your concrete surfaces from dull and dusty to polished perfection requires expertise, specialised equipment, and quality materials. Whilst this guide provides the knowledge to understand the process, achieving professional results often benefits from experienced hands.

Floor X Industries brings over a decade of concrete polishing and coating experience to Queensland properties. Their professional concrete polishing services ensure every stage from preparation through final sealing meets the highest standards. Whether you’re enhancing a residential garage, retail showroom, or warehouse facility, their team delivers flawless finishes that combine durability with visual appeal. They offer comprehensive solutions including epoxy floor coatings for maximum protection and honed concrete finish services for those preferring a more subtle aesthetic. Contact Floor X Industries for a consultation and discover how professional concrete polishing elevates your property’s value and functionality.
Frequently asked questions
What grit level is best for polishing concrete?
Start with 50-100 grit diamond pads for initial grinding to remove surface imperfections and level the concrete. Progress through medium grits of 100-400, then fine grits of 400-1500 for developing gloss. Finish with 1500-3000 grit for maximum reflectivity and mirror-like shine. The finer the final grit, the higher the gloss level you’ll achieve.
How long does polished concrete last in commercial spaces?
Polished concrete floors can last 10-20 years or more with proper care and maintenance, making them extremely cost-effective for commercial applications. Durability depends heavily on the quality of initial polishing, protective coatings applied, and consistent maintenance practices. High-traffic areas may require recoating every 3-5 years, whilst the polished concrete substrate beneath remains intact for decades.
Can I polish concrete floors myself or should I hire professionals?
DIY polishing is possible for small areas but professionals ensure superior results on larger or complex projects. Small residential projects like garage floors can be tackled with rented equipment if you’re comfortable with power tools and have time for the multi-day process. Commercial spaces, intricate designs, or floors requiring structural repairs benefit significantly from professional expertise. Floor X Industries provides expert assessment and execution, ensuring your polished concrete meets both aesthetic and performance expectations without the learning curve and equipment investment of DIY approaches.
What’s the difference between polished concrete and epoxy coatings?
Polished concrete mechanically refines the concrete surface itself to create shine and smoothness, whilst epoxy creates a separate coating layer on top of concrete. Polished concrete showcases the natural aggregate and concrete colour, offering a more industrial aesthetic. Epoxy coatings provide a thicker protective layer with more colour and design options, including decorative flakes and metallic effects. Many projects combine both, polishing the concrete first then applying a thin epoxy seal for optimal protection and appearance.
How soon can I walk on freshly polished and coated concrete?
Polished concrete without coatings can typically handle light foot traffic immediately after the final polishing stage. However, if you’ve applied protective coatings, curing times vary by product. Epoxy coatings usually allow light foot traffic after 24 hours but require 5-7 days for full cure before heavy use or vehicle traffic. Polyurethane coatings may need 48-72 hours before walking and up to two weeks for complete hardness. Always follow your specific coating manufacturer’s recommendations for cure times based on temperature and humidity conditions.


